
Best MIDI Controllers to Buy in July 2026
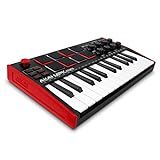
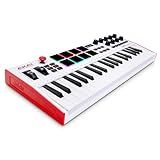
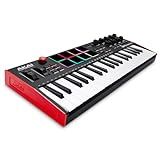
Akai Professional MPK Mini MK3-25 Key USB MIDI Keyboard Controller With 8 Backlit Drum Pads, 8 Knobs, Music Production Software and Native Instruments Sound Package (NKS Integration)
-
25 VELOCITY-SENSITIVE KEYS: PERFECT FOR STUDIO PRODUCTION AND BEAT MAKING.
-
DYNAMIC CONTROL: INNOVATE WITH A 4-WAY THUMBSTICK AND BUILT-IN ARPEGGIATOR.
-
EXCLUSIVE NKS BUNDLE: CHOOSE FROM THREE CURATED SOUND COLLECTIONS TODAY!


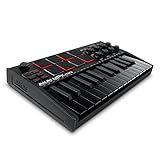
Akai Professional MPK Mini MK3-25 Key USB MIDI Keyboard Controller With 8 Backlit Drum Pads, 8 Knobs, Music Production Software and Native Instruments Sound Package (NKS Integration), Black
-
TOTAL CONTROL WITH DYNAMIC PITCH & MODULATION INNOVATIVE 4-WAY THUMBSTICK ENHANCES YOUR PRODUCTION CAPABILITIES.
-
NKS INTEGRATION FOR STREAMLINED WORKFLOW EASILY ACCESS NATIVE INSTRUMENTS PRESETS AND SOUND LIBRARIES.
-
1500+ SOUNDS FOR PRO PRODUCTION OUT-OF-THE-BOX COMPLETE STARTER KIT WITH MPC BEATS, VIRTUAL INSTRUMENTS, AND MORE.
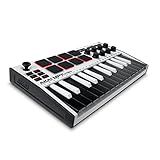
Akai Professional MPK Mini MK3-25 Key USB MIDI Keyboard Controller With 8 Backlit Drum Pads, 8 Knobs, Music Production Software and Native Instruments Sound Package (NKS Integration), White
-
USB MIDI CONTROLLER: 25 VELOCITY-SENSITIVE KEYS FOR CREATIVE CONTROL.
-
NATIVE KONTROL STANDARD: EFFORTLESS INTEGRATION WITH YOUR STUDIO SETUP.
-
COMPLIMENTARY NKS BUNDLE: CHOOSE FROM CURATED SOUND LIBRARIES FOR FREE!
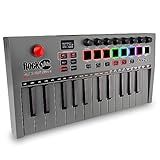
RockJam 25 Key Bluetooth Midi Keyboard
- BLUETOOTH MIDI CONNECTION: GO WIRELESS FOR A CLUTTER-FREE SETUP.
- PLAY ANYWHERE: RECHARGEABLE BATTERY EMPOWERS MUSICIANS ON THE MOVE.
- DYNAMIC CONTROL: VERSATILE PADS AND KNOBS FOR COMPLETE MUSIC PRODUCTION.
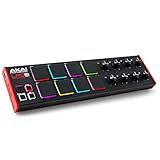
Akai Professional LPD8 - USB MIDI Controller with 8 Responsive RGB MPC Drum Pads for Mac and PC, 8 Assignable Knobs and Music Production Software
- RGB-BACKLIT PADS: TRIGGER SAMPLES & LOOPS WITH 8 RESPONSIVE PADS.
- TACTILE CONTROL: 8 Q-LINK KNOBS FOR SEAMLESS DAW PARAMETER MAPPING.
- PORTABLE & DURABLE: LIGHTWEIGHT DESIGN FOR MUSIC PRODUCTION ANYWHERE.
Akai Professional MPK Mini Plus - USB MIDI Keyboard Controller with 37 Mini Keys, 8 MPC Pads, Sequencer, MIDI/CV/Gate I/O and Native Instruments Sound Package, White Limited Edition
-
UNLOCK FULL CREATIVITY WITH 37-KEY CONTROL AND USB CONNECTIVITY.
-
CONNECT AND CONTROL ALL YOUR GEAR WITH ADVANCED MIDI AND CV/GATE I/O.
-
RECORD ANYWHERE USING THE BUILT-IN SEQUENCER FOR MELODIES AND DRUMS.
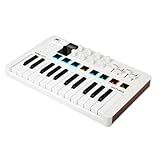
Arturia MiniLab 3 - Universal MIDI Controller for Music Production, with All-in-One Software Package - 25 Keys, 8 Multi-Color Pads - White
- VERSATILE CONTROL: ADAPTS TO YOUR UNIQUE WORKFLOW EFFORTLESSLY.
- PREMIUM VELOCITY-SENSITIVE KEYS FOR DYNAMIC MUSIC CREATION.
- INTUITIVE DESIGN: FORGET THE MOUSE AND IMMERSE IN YOUR SOUND!
Donner USB-C MIDI Keyboard Controller, 25 Key Portable Mini MIDI Keyboard with 8 Drum Pads, OLED Display, 16 Smart Scales, Arpeggio, Replay, 4 DAW Software and 40 Teaching Courses, DMK 25 Pro Black
-
SMART DYNAMIC SCALE MODE: EFFORTLESSLY CREATE BASS LINES AND MELODIES!
-
REAL-TIME MULTI-MODE CONTROL: UNLOCK CREATIVITY WITH ARPEGGIOS AND CHORDS!
-
40 KEYBOARD-TEACHING COURSES: MASTER MUSIC ARRANGEMENT WITH ENGAGING LESSONS!
Akai Professional MPK Mini Plus - USB MIDI Keyboard Controller with 37 Mini Keys, 8 MPC Pads, Sequencer, MIDI/CV/Gate I/O, Music Production Software and Native Instruments Sound Package
-
SEAMLESS DAW INTEGRATION: EFFORTLESSLY CONTROL YOUR STUDIO WITH ADVANCED MIDI FUNCTIONALITY.
-
EXCLUSIVE NKS BUNDLE: UNLOCK NATIVE INSTRUMENTS' PRESETS WITH YOUR PURCHASE!
-
HANDS-FREE COMPOSITION: RECORD AND COMPOSE WITH A BUILT-IN 64-STEP SEQUENCER!
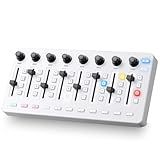
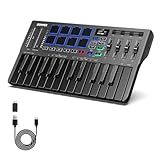
Vangoa Wireless Midi Controller Mixer Mute, Portable USB Midi Keyboard controlador Mixing Console 43 Backlit Button, 8 Channel Faders with LED indicator, 8 Assignable Endless Knobs for Daw, Mac, PC
-
43 BACKLIT BUTTONS: IGNITE CREATIVITY WITH INSTANT BEAT AND MELODY TRIGGERS!
-
8 CUSTOM FADERS: EFFORTLESSLY CUSTOMIZE YOUR TRACKS WITH LED-GUIDED FINESSE!
-
PORTABLE DESIGN: TAKE YOUR MUSIC ANYWHERE-CREATE ON-THE-GO WITH EASE!
Integrating MIDI controllers into a home studio setup can greatly enhance your music production capabilities. First, you will need to connect your MIDI controller to your computer or audio interface using a USB cable or MIDI cables. Make sure your MIDI controller is compatible with your software.
Next, you will need to configure your DAW (Digital Audio Workstation) to recognize the MIDI controller. This may involve selecting the MIDI input and output in the settings of your software.
Once your MIDI controller is connected and configured, you can start using it to control virtual instruments, synths, and effects within your DAW. You can assign different parameters to the knobs, sliders, and pads on your MIDI controller to create dynamic and expressive performances.
Experiment with different MIDI mappings and setups to find a configuration that works best for your workflow. Don't be afraid to get creative and try new things with your MIDI controller to make the most out of your home studio setup.
What is the function of MIDI controller presets?
MIDI controller presets allow users to save and recall specific settings or configurations for their MIDI controller. This can include assigned MIDI mappings, customized control layouts, effects settings, and more. Presets enable users to quickly switch between different configurations for different purposes or environments, making it easier to access and use their preferred settings without having to manually reconfigure the controller each time.
How to map MIDI controllers in Pro Tools?
To map MIDI controllers in Pro Tools, follow these steps:
- Connect your MIDI controller to your computer and ensure it is recognized by Pro Tools.
- Go to the "Setup" menu in Pro Tools and select "Peripherals."
- In the Peripherals window, click on the "MIDI Controllers" tab.
- Click on the "Type" dropdown menu and select the type of MIDI controller you are using (e.g. keyboard, drum pads, faders, knobs).
- Click on the "Receive From" dropdown menu and select your MIDI controller from the list of available devices.
- Click on the "Send To" dropdown menu and select the MIDI input on the track or instrument you want to control with your MIDI controller.
- Click on the "MIDI Learn" button and move a knob, slider, or press a button on your MIDI controller to assign it to a parameter in Pro Tools.
- You can now control the selected parameter in Pro Tools using your MIDI controller.
Repeat these steps for each parameter you want to map to your MIDI controller. Make sure to save your MIDI controller mapping settings in the Peripherals window so you can easily recall them in the future.
What is the importance of MIDI controller sensitivity?
MIDI controller sensitivity is important because it allows the player to have dynamic control over the sound being produced. This means that the velocity with which a key is pressed or a knob is turned can affect the volume, tone, and other parameters of the sound being created. This added level of control allows for more expressive performances and can help to create more realistic and engaging music. Additionally, sensitivity can also affect the feel and responsiveness of the instrument, making it easier for the player to perform complex passages and nuances in their playing.
How to configure MIDI controllers in Logic Pro X?
To configure MIDI controllers in Logic Pro X, follow these steps:
- Connect your MIDI controller to your computer and make sure it is recognized by Logic Pro X.
- Open Logic Pro X and go to the Preferences menu by clicking on Logic Pro X in the top left corner of the screen and selecting Preferences.
- In the Preferences menu, click on the MIDI tab.
- In the MIDI tab, you will see a list of all the MIDI devices connected to your computer. Find your MIDI controller in the list and check the box next to it to enable it for use in Logic Pro X.
- Once your MIDI controller is enabled, you can assign specific functions to the controller by going to the Control Surfaces tab in the Preferences menu.
- In the Control Surfaces tab, click on the Setup button and choose New... from the drop-down menu.
- Select your MIDI controller from the list of available control surfaces and click Add.
- You can now assign different functions to the knobs, sliders, and buttons on your MIDI controller by clicking on the Learn button next to the function you want to assign and moving the corresponding control on your MIDI controller.
- Once you have assigned all the functions you want, click Done to save your changes.
Your MIDI controller is now configured and ready to use in Logic Pro X. You can now control various parameters and functions within the software using your MIDI controller.
How to troubleshoot MIDI controller connection issues?
- Check the physical connections: Make sure that your MIDI controller is properly connected to your computer or audio interface using the appropriate cables. Ensure that the cables are securely plugged in and not damaged.
- Restart your devices: Sometimes simply restarting your MIDI controller, computer, and audio interface can resolve connection issues. Turn off all devices, wait a few seconds, and then turn them back on.
- Update drivers and firmware: Check if there are any available updates for the drivers and firmware of your MIDI controller. Installing the latest updates can often fix compatibility issues.
- Check settings and configurations: Make sure that the MIDI controller is set up correctly in your music software or DAW. Ensure that the MIDI input and output settings are configured properly.
- Test with a different device: If possible, try connecting the MIDI controller to a different device or computer to see if the issue is with the controller itself or the original setup.
- Change USB ports: If your MIDI controller is connected via USB, try using a different USB port on your computer to rule out any issues with the port.
- Reset settings: Some MIDI controllers have a factory reset option that can be used as a last resort if all other troubleshooting steps fail. Check the user manual for instructions on how to reset your specific controller.
- Contact customer support: If you have tried all the troubleshooting steps and are still experiencing connection issues, reach out to the manufacturer's customer support for further assistance. They may be able to provide additional troubleshooting tips or arrange for a repair or replacement if necessary.
What is the difference between USB and MIDI controllers?
USB controllers and MIDI controllers are both types of hardware used to control music software or hardware. The main difference between the two is the way they connect to a computer or device.
USB controllers connect to a computer or device using a USB cable. They typically have built-in soundcards and can generate sounds on their own, making them ideal for musicians who need a portable setup or want to play live without the need for additional equipment.
MIDI controllers, on the other hand, connect to a computer or device using a MIDI cable or USB-MIDI adapter. MIDI controllers do not have built-in sound generation capabilities and rely on software or external hardware to generate sounds. They are often used in conjunction with music production software to control virtual instruments, effects, and other parameters.
In summary, USB controllers are standalone devices that can generate sounds on their own, while MIDI controllers require a separate source of sound and are typically used to control music software or external hardware.